Animating clay isn't so complicated, after a few instant you could see the
clay taking live on your screen.
After the first try, you would quicky have the need to go over, giving the
speaking to the characters, puting them on a land, etc.
Real beginer in claymotion, I would like to share my small experience,
giving you some tips which I hope will help you in your stop motion
project.
If you do not find all information you are looking for here, do a quick
visit on
F.A.Q. page.
A stop motion film it
composed by successive fixed picture. When you show them successively, it
give the movement illusion.
In few word, below you will see how I do it :
1) Sooting :
Done image by image with a digital still camera. Between each image I move
the character. After the images are transferred and stocked on computer.
2) Video assembly : I made a video file using DSC JPEG
image. Here It's possible to mix either video or fixed image used as
background.
3) Sound : Record sound and assembly with video file. In some
case I record sound before shooting for knowing the length and shoot the
related amount of photos.
4) Publication : I use either the computer video output to
produce a VHS or I produce a CD/DVD in order to show it on home TV or DVD
reader.
 Not
having that of place at the house, the studio can (if one can call that a
studio) summarizes itself with a space of 2 square meters in a part
transformed into workshop. %0dMy puppet sizes are approximately 11 cm top
and this fact the decoration can be contained in a surface of 1 square
meter. %0dFor shooting I arranged a camera foot posed on a piece of wood,
the unit is attached to the decoration by a screw clamp in order to
guarantee a maximum stability.
Not
having that of place at the house, the studio can (if one can call that a
studio) summarizes itself with a space of 2 square meters in a part
transformed into workshop. %0dMy puppet sizes are approximately 11 cm top
and this fact the decoration can be contained in a surface of 1 square
meter. %0dFor shooting I arranged a camera foot posed on a piece of wood,
the unit is attached to the decoration by a screw clamp in order to
guarantee a maximum stability.
Lighting
mall budget so low lighting
quality, it consists of simple bulb daylight of 150 Watt. Internal camera
flash of is always off and shooting a white sheet under this lighting
regulates the white balance.
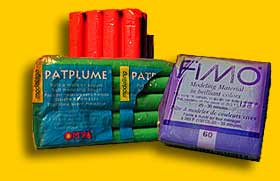
Which clay ?
For animated part I use PATPLUME or PLASTICOLOR from OMYA manufacturer oil
base. In fact the key issue is to not use water clay base, which dry and
crackle after some time. For fixed parts (hand, mouth, accessory) I use
FIMO clay type, this one is to be cook and can be paint.
Color skin
If you are looking for sepcial color, you have to know that oil bases clay
can be easyly mixed. In case of skin color, I add to the white clay an
little bit of yellow and an little bit less of black and red.
Clean result
During the manipulation of your pupets, ensure that you hand are
perfectcly clean in order to keep the same color aspect of your pupets
durring all the shooting process.
Body and member
My characters are always build with an armature on which I put clay. Its
necsary in order to minimize the characters weight. Bellow you will find
the differenbt type I used for buildin the armature :
 -
With a bale of paper wrapped in adhesive tape, lmembers are plastic pipes
in which I put a wire.
-
With a bale of paper wrapped in adhesive tape, lmembers are plastic pipes
in which I put a wire.
- With alluminim wire armature on which I add fimo clay, after I cook it .
- For big charactrers (over 20 cm) I use wire grid and I covered it with paper.
-
When I need charcaters who will have few mouvements, I use plastic pupets.
Note: Key issue is to have resistant wire armature, used cooked aluminium wire . D'ont use other material as iron wire, if not after few manipulation the wire will broke.
The hands
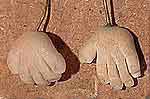 Easy
way is to build either hand with Fimo, then you exchange it according the
action of your pupets,
thus you can handle them without fear to damage them. If you follow this
technic, please note that your pupest will not able to take object.
Easy
way is to build either hand with Fimo, then you exchange it according the
action of your pupets,
thus you can handle them without fear to damage them. If you follow this
technic, please note that your pupest will not able to take object.
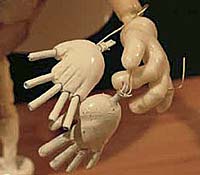
Others solutions,
Is to to build your hand with normal clay, with ou without
an wire armature inside. Issue is the maniupation if you build small
hand.
Some times I biuild a wire armature + corver with fimo, On finger I add plastic pipes and I cover all with latex . In oder to colorize ther hand , you can put ink in latex before.
The eyes
Here
also there are either way to do it:
- Directly in clay, it's an easy way for changing their form and size (eg.
Increasing eye size allows giving surprising attitude).
 -
Using plastic existing pearls (I color it with a marker), issue is to find
the right size according the face of subject.
-
Using plastic existing pearls (I color it with a marker), issue is to find
the right size according the face of subject.
- With modeling plastic and painting it as shown on left image. It takes
more time but it's more realistic.
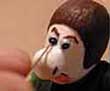 In
any case, for their movements a simple needle is enough to
move them. A nice idea
was communicated by email; it's to put a bit of
talk powder in the eye
sockets before you put the eyeballs in for good. It prevents plasticine
from sticking on the eyeballs, eg easier to move
the eyes.
In
any case, for their movements a simple needle is enough to
move them. A nice idea
was communicated by email; it's to put a bit of
talk powder in the eye
sockets before you put the eyeballs in for good. It prevents plasticine
from sticking on the eyeballs, eg easier to move
the eyes.
The mouth
Two techniques,
the first one consist in carving with each consonance the face
but they is really tiresome, the second one consists in using several mouth as
for hands.
 For labial synchronization I measure the time of one consonance and I
leave the shape of corresponding mouth during same time before passing to
the following one.
For labial synchronization I measure the time of one consonance and I
leave the shape of corresponding mouth during same time before passing to
the following one.
Sometime, I mixt the first technique with morphing
software, it's a useful trick for having a fluid mouth movement without
carving a lot the puppet.
Tips: in order to use the right mouth, read the
dialogue in front an mirror !
 Mirror
As it is difficult to cut a low-size mirror I found another way. I used a
silvered CD, which I cut with the metal saw and cutter, and the edge is
sandpaper in order to give the illusion of frosted worm. Only problem it
is the reflection of the light that can give according to the orientation
of the mirror a standard reflection rainbow.
 Wallpaper
For the realization of paper paints on the scale of the characters I draw
in first a pattern. This pattern is then used for filling page with
software like CorelDraw. Then I print an A4 page that I paste on the walls
of the decoration using woodworking glue diluted in water. I do not use
dedicated glue for wallpaper because it's too heavy.
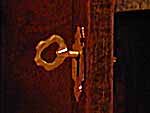 Key
Key
The key consists of wire brass onto which I weld with tin a disc formatted
beforehand at the file. The lock is produced in copper plate it such a
machined with the hand. It is one can long and delicate to realize
considering the size of the objects (8 mm), but the result is nice?
 Out
door environnement
Out
door environnement
An easy way to build an outdoor environnement is to shoot and print it on
a sheet of paper using an inkjet printer.
In this case I use a mat paper in order to minimise the light reflexion on
the printed paper sheet during shooting.
Shooting
with DSC
The hardware
I use a digital camera of 2 M pixels with zoom 35 -105 mm connected to a
PC in USB. The images which it provides have a resolution of 1600 X 1200
largely sufficient for PAL TV format.%0d%0dI choose the lowest quality
JPEG mode from the camera, so image size is around 300KB compare to 5,5MB
in uncompressed format, it's faster for the transfer to computer. JPEG
compression is not a real problem, as during the assembly the pictures are
reduced to 640x480 (or in 768 x 576).
The camera is in mode aperture priority F4, for focus adjustment I use the
various macro modes according to the distance subject (between 6 cm to 20
cm) and the position of the zoom.%0dFlash must'nt be use to prevent any
over light exposition espcially in macro mode.
Transfert toicomputer
Photos are stored in camera on a 40 MB Compact flash memory card, the
transfer is done in USB at the rate of 1 second by photo. The software
stores them on the hard disk by numbering them in the ascending order what
is particularly practical for the later assembly.
Nombres de
photos
PAL and NSTC require respectively 25 and 30 images per second, it's 1500
or 1800 photographs for one minute. In fact while working to 12 or 15
images per seconds that is sufficient, I read that the majority of the
scenes of Wallace and Grommit was done at 15 images (Ouf! only 900
photographs for one minute of film). For labial synchronization if the
subject does not move when it speaks, I make only one shot per consonance.
(Ex: WHOHA = 2 shots).
 If
your film is not fluid it's that some shots are missing, and you have to
shoot again some frames. Unfortunately in some case it's to late, your
pupets has moved so much and you can't give it the same position as you
have to do. Another way it's the morphing to create missing photos between
2 shoots. In sample, I voluntary used morphing for showing the principal
actor in superposition on background picture. If you haven't morphing
software you must find some freeware on the WEB...
If
your film is not fluid it's that some shots are missing, and you have to
shoot again some frames. Unfortunately in some case it's to late, your
pupets has moved so much and you can't give it the same position as you
have to do. Another way it's the morphing to create missing photos between
2 shoots. In sample, I voluntary used morphing for showing the principal
actor in superposition on background picture. If you haven't morphing
software you must find some freeware on the WEB...
In order to
include a personage in an external land (eg :BALANCE.AVI) or sepcial
background (eg : REVEIL.AVI), I used the blue color background technique.
Idea is to shoot a video on a blue background, add it on image or a video,
the blue colour is remove bye software (e. Adobe After Effect). Limit of
this tricks, is that character must not contain the same blue colour as
background, if not it will be remove as well. It's also a useful tip for
shooting separately 2 actors who will present in same time on the video.
Material : For blue back ground, you can use a printed shheet on your inkjet printer, prefer mat paper and adjust the focus of your camera in order to obtain on the back of your image something to regular. Of course you can doit with an other color .
From fixed image to animated image
Producing a
video file
From the numbered photos I carry out file AVI not compress generally of
duration of 15 of seconds. With this intention I use a very nice freeware
which I found on the NET: " Fast Movie Processor 1.44 "(Last version is
name VideoMach). It allows to crop and resize the images, apply filters
and define frame speed in image per second, moreover it very quickly does
that on PC.
Here you will find a tutorial (in French) where I explain how I do with
FMP:
FMP tutorial
PDF .
|
|
|

Video
and sound assemebly
I use software MGI VideoWave II to assemble the various AVI and the files
sounds. The choice of MGI VideoWave was not determined by objective
criteria, I use it because it was delivered with my video card ATI, in
addition it is easy to use and rather user-friendly. An other software
currently free is VirtualDub , try it's really nice. Now if you haven't
limited budget the best wil to use: Adobe Premiere for the assembling and
Adobe AfterEffects for effects.